AIEL Shop Tips
SHOP STORAGE
In any working environment, things must be kept somewhere.
Options for efficient storage are discussed in this article.
|
INFORMATION BELOW MAY |
Be aware neither Atlantic Illumination, nor its owner |
|
Disorganised shops often have their work benches crowded with stuff because no suitable area was created for supplies. So they go from being work benches to becoming *storage* benches, and less work gets done. Proper shop storage solves this and other clutter problems. Solutions come in the forms of shelving, cupboards, cable racks, drawers, tool boards, and so on. Typically, a shop needs to employ all the methods discussed here because one is usually more suitable for a given purpose than are the others. Cable Storage is covered in its own section, so we will move on to the discussions regarding a variety of other storage solutions. These are written for a medium-sized facility, so scale them as necessary to fit your space. |
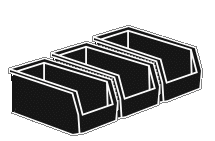
For parts you wish to have in the open for easy access, stacking plastic bins fill the bill. These come in various sizes and depths. Select and arrange ones to suit your needs, placing them onto shelves or a bench bridge. Alternatively, use brackets to hang them onto a wall or the side of a large cabinet or cupboard. The brackets allow for removal of a bin to take it to a bench for sorting, but provide a handy place to hang the bin out of the way of your work.
Being plastic, these bins come in a variety of colours. Stay consistent with your choices so that like parts will occupy the same colour of bin.
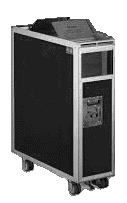
Do you have an inventory of empty road cases? Place little used lighting gear into them, or employ them to store shop equipment you want to keep but are not currently using. Make usage of these empty cases to take up the clutter around your shop. Put similar items in a given case to promote some sort of organisation.
Label each case as to its contents and then stack them with the most likely to be used placed on top and in front. In addition, keep an inventory list on file so you won't forget what is in that little case way in the back on the bottom. This list will save some future search for an item you know you have but don't know its location in your stack of cases.
Leave some of them empty for when the time arrives to use one of these storage cases. If the empty case is unsuitable, move the contents from a case that does fit your purpose to one of the empties. Remember to update both the label and filed inventory list.
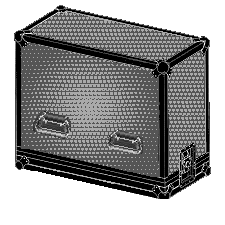
An excellent case for storage is the aircraft catering unit. These are narrow enough to fit into those spaces beside a bench or cabinet that are usually only wide enough for a garbage can. Doors on either end open to reveal shelves of removable bins, while two fold-out trays on top can be used to temporarily hold items during a project.
These units ride on double-wheel casters with a foot-controlled lock & release mechanism. As such, they can be rolled into and out of narrow spaces, then locked in place while items are loaded or unloaded. The bins can be brought right to the bench and returned when finished.
Since the door catches have loops to fit padlocks, this is a secure case for valuables or items likely to be pilfered. Aircraft catering units are a very unique and thoroughly handy storage solution.
For things which you do not wish to display, or for security, an enclosed cupboard system is recommended. You may design and build a set for yourself, but you can often get old kitchen cupboards from used building supply stores or demolition companies. These often come with an upper and lower set of cupboards, and sometimes with a countertop that has shelves and drawers underneath. If you have a sink in your shop, you may be able to place such a cabinet next to it to use as a Wet Station.
Don't ignore the insides of the doors. If they are strong enough, use them for tool boards, flashlights, electronic test leads and adaptors, storage for cleaners, and so on.
Paint the cabinets to suit and label them as to contents. Sensitive supplies may secured by adding inner dividers, beefing up to heavier hinges that are bolted on, and then adding a hasp & lock to the outside. Hide the keys well away from the cupboard so those from whom you wish to keep the key location secret, will not be able to observe while you retrieve them.

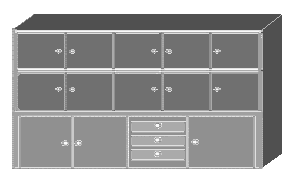
Some items don't need to be on display but still need to be categorised. Sets of large drawers fill this need. Inside each drawer, place boxes or bins to keep items separated, and to present themselves in an unambiguous way. Install drawers under benches, under stairwells and anywhere not being used for anything else. The drawers keep the contents clean while providing additional storage space reclaimed from dead areas.
Another type are the large plastic drawer units that can be bought at hardware and home consumer stores. They come in two- to four-drawer models. These are meant for light storage because too much weight in these will warp them to the point that the drawers won't open. These can be strengthened with plywood to some extent, and wood should be used if items are to be placed on top because the top plates dish inward easily.
If weight is an issue, buy wooden or steel drawer models. In particular, office file units work well for this purpose if the steel is thick enough. If their drawers flex easily, don't buy them.

A cabinet of low-height slots, such as provided by a literature rack, is perfect for holding printed materials that need to be close to hand during the day-to-day running of a shop. These might include schedules for hazardous materials, shop procedures, repair or report forms, and employee time sheets. Some may wish to include catalogues and equipment manuals, but these are best stored in a file cabinet as they are not typically used on a daily basis.
Another perfect usage for a literature rack is to hold cut gel. The multiple slots allow sorting of a great number of sheets. In addition, if the rack is strong enough and the height of the slots adequate, gel frames and barndoors might be housed here, as well.

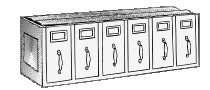
A few sets of steel lockers make for a handy storage method because they can accommodate tall items. Plan on placing brooms, mops and accessories in one. Another might have extension handles for paint rollers. Tripod stands might be stored in a third.
There are also locker models that have two or more smaller compartments stacked on top of one another. These are ideal to use as security storage.
Don't neglect the outside sides of the lockers. If the units can be situated with one or both sides accessible, attach pegs there to hang coats, cables, and tools. Or place a calendar, bulletin board, or signs in these spaces that are relevant to what is located next to the lockers. Use magnets for these -- or store magnets themselves there.

A ceiling that is not too low or too high can be used for additional storage. For items that are long, such as tubing, make up square-U brackets of pipe and fittings or from strong wood. Attach them to your ceiling for accessible storage. Add a bed of wood for items that don't span the distance from bracket to bracket.
Attach pipe and fittings directly to the ceiling to hang lesser-used stage lighting fixtures by their own pipe clamps. This frees up cases.
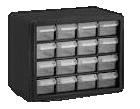
Items that can be divided into small lots can be stored inside parts drawers. These typically sit at the back of a bench or on shelves. Those on a bench can take up less work space if they are raised onto a bridge that spans the back of the bench at a height to allow items such as a multimeter to fit underneath, while not being so high that the drawers are difficult to reach into.
Select units that have the same-sized drawers if you have many parts that are similar. Get ones with a variety of drawer sizes for work that requires parts of differing sizes or needing space for large quantities.
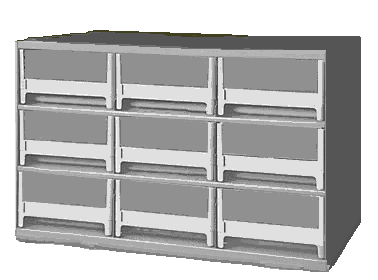
For parts which take up more space than is available from the shelf bins, a parts cabinet is the next level up. These would have drawers to suit, and they also generally have label holders. Make a list of the parts to go into this cabinet and then organise them by type and/or alphabetically. If this cabinet is to contain parts often used during maintenance, be sure to locate it close to the appropriate work bench.
Stackables: For larger parts, a bigger cabinet is the logical next step. In this case and the one above, if you are buying new, try to purchase stackable cabinets so that as your shop grows, you will be able to easily add on units as needed. Some setups allow for the same sized cabinets to be stacked, but with the bottom unit having fewer, but larger, drawers. Arrange the contents and then label each drawer. Small cardboard boxes with the tops removed work well for inside-the-drawer organizing for all but the heaviest of parts.
Depending on the size, one might store adhesive tape, spray paint, bottles, or bulk boxes of hardware in these handy compartments. If the depth is enough, short lengths of tubing might fit.
Look for surplus postal units as seen in apartment building lobbies; orient them so their open backs face outward for instant pigeon hole storage. Stand one or more up vertically to take up less space if these must be on a bench.
Deeper pigeon hole units can be made from the hollow tubes found in the center of carpet rolls. These are very robustly constructed. Cut some to length and lash them together. These are excellent for storing long items such as piping and tripod stands.

If you have a lot of bench test equipment, instead of stacking it or putting it on shelves, consider a small equipment rack. Even if the equipment is not designed to be rack mountable, install shelves that fit standard racks. Space them based on the height of the equipment. Mount a power bar right in the rack and have it switched from a convenient location next to the bench. Cut holes in any shelves you installed so as to pass through the equipment line cords. Place pegboard hardware into unused rack rail holes to hang test leads and other accessories.
Racks are often available used from audio-visual places and military surplus. Since these will be permanent shop installations, height and depth become less of a factor. Larger racks often sell for low prices on the used market because fewer people want them.
Aside from the tool board and under-bench shelves discussed in Work Bench Setups, you should have some side shelves and drawers available for typical things used at the bench. A shelving unit at right angles to the work surface is a must for parts you might require while repairing lights and associated equipment. It would hold bins of parts related with those repairs, and include things such as hardware, shutters, knobs, connectors, fuses, etc.
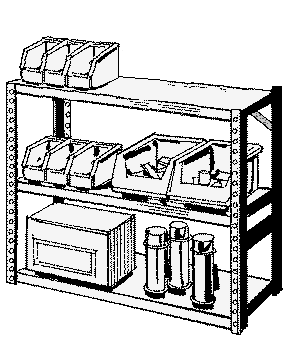
Floor Units: For bigger items or those that are needed less, a larger, stronger unit is required. A wooden structure with inner adjustable shelves fits the bill. As your shop and/or projects change, the spaces may be altered to suit. Each may be easily labelled as to type of item due to the thicker shelves used. If you have room, this type of unit should be 50 to 75 centimetres deep so that larger items and boxes may be stored without protruding into the work space. For safety reasons, it is recommended that you don't store extra heavy items above head level.
These units are large enough to accept big bins on most shelves. Make use of old toy boxes, refrigerator crispers, recycling bins, and any box with handles or grip openings such as banana boxes. Store items of a weight able to be handled by each box or bin, and colour-code/label to identify contents. (See General Tips for more on colour coding.
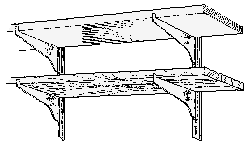
Wall Units: You might also opt to go with wall mounts and shelf brackets that are the adjustable type. This method is less work than constructing a stand alone unit, as exampled above. Costs can be lower with this type, as well, especially if rough lumber is used for the shelves. Typical brackets allow up to a 30-centimetre shelf depth. Consider stair tread as shelves because it is less prone to warpage, and the bullnose presents a smooth, rounded edge. Be sure wall-mounted units are well anchored into a solid stud or beam, and again, don't store too heavy an item above head level.
Organisation is the key to any shop. It allows one
to locate things quickly, render inventory in a more timely
fashion, and results in a visually pleasant area in which to work.
This Discussion is
Available in
Plain Text for
Your Archives
Lighting Shop Storage, Text Format
See More Suggestions in
General Shop Tips
View our storage solutions:
AIEL Shop Photo Tour
|
Return to the |
Return to the |